
Simple Checkout Fields Manager for WooCommerce, by Naked Cat Plugins, lets you manage the WooCommerce Block-based Checkout’s core fields (rename them, reorder them and set their width, and remove them or make them required or optional, globally or per country) and add your own custom text, select and checkbox fields, with conditional rules to show or require them based on what is in the cart or on what the customer has already filled in. The core field settings, and the custom fields you add, also apply to the classic checkout and to My Account > Addresses. This page covers setup, licensing, and known limitations. For pricing and installation, see the product page.
Table of Contents
Support
How to request technical support?
If the issue you need technical support with is not covered on this page, click the link next to the license key, on the plugin settings, and fill out the ticket with your request.
Where do I report security vulnerabilities found in this plugin?
You can report any security bugs found in the source code of this plugin through the Patchstack Vulnerability Disclosure Program.
The Patchstack team will assist you with verification, CVE assignment, and take care of notifying us.
Does this plugin support the legacy/classic WooCommerce checkout experience?
Yes, though not yet in full.
Everything you can set on a core field, renaming it, making it required or optional, changing its order, its width, removing it, and giving it a different name on the billing and on the shipping address, applies to the classic checkout and to My Account > Addresses, as well as to the block-based checkout.
The custom fields you add are shown on the classic checkout too, as a beta feature, whichever section you put them in. They are saved on the order under the same meta keys the block-based checkout uses, so an order looks the same whichever checkout produced it. The classic checkout has no “Contact information” section and its “Additional information” is the order notes area, so those two sections do not land in a place of the same name, and where each one goes is covered just below. They also appear on My Account > Addresses and on the account details form, because WooCommerce renders them there itself, with the exception of “Select with fee per option”.
The rest is specific to the block-based checkout: live conditional rules, “Select with fee”, the “Full width” option, and hiding a field on the order confirmation. See “Which custom fields are shown on the classic checkout, and what is still missing?” just below, and “Why aren’t the customizations applied in full to the My Account account information and address forms?” further down, for exactly what does and doesn’t carry over.
Which custom fields are shown on the classic checkout, and what is still missing?
Custom fields on the classic checkout are new and ship as a beta. This is exactly where it stands.
What is shown: custom fields of the Text, Select and Checkbox types, from all three sections. Their name, options, whether they are required, their position, their width, maximum length, pattern, autofill, capitalization, tooltip and your own “data-” attributes all apply, and your custom PHP validation through the swcbcf_validate_callback_{location}_{field-slug} filter runs on submit.
Where each section goes, since the classic checkout is not laid out the same way:
- Address fields go with the address they belong to, on both the billing and the shipping form, in the position you chose.
- Contact information fields go with the billing address by default, after the core fields. Each field has a “Classic checkout section” option if you would rather it went under “Additional information” instead. Wherever you put it, it is the same field, stored under the same key, and it still follows the customer to their next order, which the fields that belong to “Additional information” do not.
- Additional information fields go under “Additional information”, which on the classic checkout is the order notes area, after the order notes box itself. This needs the “Serve a corrected checkout template” setting, or a WooCommerce new enough to have fixed its own template. See “Why do my Additional information fields not show on the classic checkout?” above.
What is not shown:
- The “Select with fee per option” type. The fee is applied from the cart, and the classic checkout only recalculates the cart for fields it has been told to watch. These fields are not shown on the My Account forms either, for the same reason.
- Any field with conditional rules, visibility or required. On the block-based checkout those rules are evaluated in the browser as the customer types, and the classic checkout has nothing that does that. A field with rules would be shown to everyone, always, which is worse than not showing it, so it is held back. The plugin’s settings page names the fields this applies to, under the section they belong to, so a field that is missing from your checkout is not something you have to work out for yourself. That notice only appears on a store whose checkout is the classic one, since it is no use to anyone else. If you serve both, a block checkout page with a classic one kept alongside it, the
swcbcf_classic_checkout_in_usefilter forces it on.
Where the values are saved but not yet shown back: the value is written to the order correctly. You can see it on the order edit screen in the admin, where you can also change it, in the orders list column if you turn that on for the field, and by reading it with the swcbcf_get_order_field() helper. WooCommerce itself does not show it on the order confirmation (thank you) screen, in the order emails, or on the customer’s order view under My Account.
All of those go through a single WooCommerce method that returns nothing at all for an order the block-based checkout did not create, and there is no filter to change that. The order edit screen works because this plugin puts the fields there itself, as a workaround, that screen being where a shop owner reads an order in order to fulfil it. The other three would each need the same treatment, which would mean reimplementing WooCommerce’s own rendering to show data it already holds, so they are left as they are. We have asked WooCommerce to make the check filterable: https://github.com/woocommerce/woocommerce/issues/68156
Why do my “Additional information” fields not show on the classic checkout?
Because WooCommerce’s own checkout template will not render them properly, and by default the plugin would rather show nothing than show something broken. There is a setting that fixes it, described below.
Two problems, both in the same WooCommerce template, both fixed by the same one line change:
With “Enable order notes” turned off (WooCommerce > Settings > Products), nothing in that area renders at all. WooCommerce wraps the whole “Additional information” area in that setting, so it takes every other field in the area with it, not just the order notes box. Worse, the fields are still validated, so a required one fails the checkout with an error naming a field nobody can see, and the customer cannot get past it.
With order notes on, the fields would render, but on a cart that needs shipping there is no “Additional information” heading above them, so they read as part of the shipping address section. WooCommerce only adds that heading when nothing is being shipped.
We have reported both to WooCommerce, with a fix, since they affect any plugin that adds a field there and not only this one: issue 68168 and pull request 68169.
How do I make “Additional information” and “Contact information” fields work on the classic checkout?
Turn on “Serve a corrected checkout template” in the plugin’s general settings. The plugin then serves its own copy of WooCommerce’s checkout/form-shipping.php, carrying exactly the fix proposed upstream, and both problems above go away. Your fields render, headed, whether order notes are on or off.
It applies to both sections: the “Additional information” fields, and any “Contact information” field whose “Classic checkout section” option you set to show there. Contact fields left on their default, with the billing address, work on the classic checkout with or without this setting.
It is off by default, because replacing a checkout template is a bigger thing to do to a store than anything else this plugin does, and it should be a choice rather than a surprise. Three things are worth knowing:
- Your theme always wins. If the active theme has its own
woocommerce/checkout/form-shipping.php, that copy is used and the plugin does not interfere. The setting is shown but cannot be turned on, and the settings page says so. Ask your theme author to update their copy, or move the fields to the billing address. - It stands down if WooCommerce changes the template. The plugin’s copy was taken from a specific version of WooCommerce’s. If a WooCommerce update changes that file, the plugin stops serving its own copy rather than risk serving markup that has fallen behind, and tells you on the settings page. A plugin update will follow.
- It disappears once it is unnecessary. When the WooCommerce your store runs already includes the fix, the setting is hidden and the plugin stands aside, whether or not you had it turned on. Your stored preference is kept, so it comes back if you ever move to an older WooCommerce.
Until one of those two things is true, the plugin’s own copy or a WooCommerce new enough to have the fix, “Additional information” fields are not added to the classic checkout at all. That is deliberate. Adding them would mean either a checkout a customer cannot complete, or fields sitting under the wrong heading, and neither is better than the field simply not being there yet. The block-based checkout is unaffected throughout, and any values already saved stay on their orders.
A “Contact information” field set to show under “Additional information” is the exception: it falls back to the billing address rather than disappearing, since that is somewhere it genuinely works. So no data is ever lost while the setting is off, the field is just not where you asked for it.
Note that updating WooCommerce is not always enough on its own here either: a theme carrying its own copy of checkout/form-shipping.php keeps the old behaviour until that copy is updated too, which WooCommerce > Status > Templates will tell you about. The plugin checks the template that will actually run, not the WooCommerce version, so it gets this right either way.
Licensing
How to transfer the license to another domain?
You should ask for the domain change in your customer area, next to the original order details.
After you receive our reply confirming the license key is free, go to the old website settings, remove the key, and save. Then go to the new website settings, insert the same key, and save. If you cloned the website, the license key is in the database: you need to remove it, save, insert it again, and save again.
What happens if my license expires?
The plugin keeps working, your existing custom fields keep showing on the checkout, and their data keeps being saved normally. Two features are capped until you renew:
- Conditional visibility and required rules for custom and core fields stop being available
- Managing WooCommerce’s own core checkout fields (renaming them, removing them, changing their required status per field or per country, their order and their width) stops being available
Renew your license to restore these settings.
Renewing your license helps us continue improving the plugin, respond to changes in WordPress and WooCommerce, and provide you with reliable support. We highly recommend keeping it active.
General operation
Getting started guide
Install the plugin and go to WooCommerce > Simple Checkout Fields Manager. Insert the provided license code to activate it.
You’ll see three sections: “Contact information”, “Addresses (shipping and billing)”, and “Additional order information”. Click “Add field” on the section where you want your new field to appear (see “In which section should each field be placed?” below for guidance on choosing).
Choose a field type: Text, Select, Checkbox, or Select with fee per option (this last one requires WooCommerce 9.8 or above). Fill in the field label, slug (used to store the field on the order and user meta), and set the other field options. Save it.
The slug is suggested from the label as you type, separating words with an underscore the way WooCommerce’s own field keys do (contact_person). Accented letters keep their letter rather than losing it, so “Inscrição Estadual” gives inscricao_estadual. You can change it to anything you like before saving. It is fixed once the field is saved, since it is part of the meta key the values are stored under, and fields created before these were the defaults keep the slugs they already had.
Your new field is now showing up on your block-based WooCommerce checkout, and on My Account > Addresses if you put it in the address section.
You can edit or delete any field at any time. The previous order values will not be erased from the database, but you’ll not see them again on the order edit screen. That’s a limitation of the current API.
You can also manage WooCommerce’s own core address fields from the same screen: rename them, remove them, make them required or optional (globally or per country), change their order, and set their width on the forms that need one.
What’s the difference between disabling and deleting a custom field?
Disabling a field (“Disabled” toggle) hides it from the checkout, but keeps its definition and any previously saved values: you’ll still see it on the order edit screen for orders that already have it.
Deleting a field removes its definition and settings entirely. As mentioned above, its previously saved order and user data isn’t erased from the database, it just stops being editable or visible through this plugin’s admin screens. If you later add a new field using the exact same slug, that old data resurfaces again, since it’s stored and read using the slug alone.
In which section should each field be placed?
“Contact information” (saved to the order and user for next orders): any personal fields that are related to the user but not to the address, for example:
- VAT number
- Birthdate
- Passport number
- National ID number
- Preferred contact method (phone, email, WhatsApp)
- Newsletter opt-in
“Addresses (shipping and billing)” (saved to the order and user for next orders): any fields that are related to the address but not the user (as they’re duplicated on both addresses), for example:
- Contact person at the address
- Second phone number
- Location hints (landmark, gate code, floor/apartment number)
- Business hours for deliveries
- Tax ID for that specific address (if different from the user’s own)
“Additional order information” (saved only to the order and not to the user): any fields that are related to this specific order only, for example:
- Delivery date or preferred time window
- Include gift wrap
- Message to include on package
- Purchase order (PO) number, for B2B orders
- How did you hear about us?
Can the custom fields be ordered and placed between the core fields?
“Contact information” and “Additional order information” fields can only be shown after the core fields, but you can set the order of your custom fields after that.
“Addresses (shipping and billing)” fields can be placed in 5 positions: after the country, after the name fields, after the company field, after the country/address/city/postcode/state fields, and after all core fields. Inside each position, you can set a second position for your custom fields if you have more than one in each position.
The position you set is used on the classic checkout and on My Account > Addresses too. WooCommerce adds custom fields to the My Account form after it has already ordered it, so until this was handled they always ended up last there, whatever position you had chosen.
Why is an address field the wrong width on the classic checkout or on My Account > Addresses?
Because those forms don’t lay the fields out on their own, and the block-based checkout does.
On the block-based checkout the address fields are a flex container: they pair up two per line, and one left alone on a line stretches to fill it. Nothing has to declare a width, which is why the only option worth having there is “Full width”, to take a whole line on purpose.
The classic checkout and the My Account address forms work the other way round. Every field carries an explicit width, and a field that doesn’t declare one ends up neither half nor full. Two things follow from that:
- A custom field is added to the My Account address form by WooCommerce itself, without a width, so it needs to be told. On the classic checkout the plugin gives it a full width line of its own unless you say otherwise.
- Removing a core field can leave the one it used to share a line with at half width, on its own. “First name” and “Last name” are a pair, so removing “Last name” leaves “First name” at half width.
Both are fixed with the “Width” option, on the custom fields and on the core fields: full width, half width first on the line, or half width second on the line. It has no effect on the block-based checkout, which ignores it and keeps laying the fields out on its own.
Why is one of my address fields alone on its own line, stretched?
This is about the block-based checkout. For the classic checkout and the My Account address forms, see “Why is an address field the wrong width on the classic checkout or on My Account > Addresses?” above.
WooCommerce lays the address form out two fields per line. Some fields always take a whole line on their own (the country, company and address fields, and any checkbox), and the remaining ones pair up two by two. When the fields before it do not add up to a full line, a field is left alone on its line and stretched to fill it.
Which fields end up paired depends on how many are shown, so it changes if you add custom fields, remove core fields, or use conditional rules to show a field only in some situations. It is not something the plugin can decide for you.
To control it, edit the field, go to the “Position and display” tab, and turn on “Full width”. The field then always takes a whole line, and the fields after it pair up again from a clean start. The option is only available for “Addresses (shipping and billing)” fields, since the other sections are single column, and it is not shown for checkbox fields, which WooCommerce already renders full width.
Note that this is a manual setting, not an automatic fix: if you later change which fields are shown, you may need to revisit it.
What are conditional rules, and which are available?
You can use conditional rules to make custom fields visible and/or required or not. You can create complex OR and AND rules with as many conditions as you want.
Most text-type conditions (any custom Text or Select field, and the core Email, First name, Last name, Company, Address 1, Address 2, City, and Postcode fields) share the same set of operators: is / is not / contains / does not contain / matches pattern / does not match pattern / is empty / is not empty. Custom Checkbox fields instead use is checked / is not checked.
These are the conditions you can use:
- Contact
- Core
- Email (text-type operators)
- Custom
- Any custom field (operators depend on its type: text-type operators for Text/Select fields, “is checked / is not checked” for Checkbox fields)
- Core
- Address
- Core
- First name, Last name, Company, Address 1, Address 2, City, Postcode (text-type operators)
- State, Country:
is one of/is not one of/is empty/is not empty, picked from a list - Phone (text-type operators)
- Custom
- Any custom field (same rule as under Contact, above)
- If the field you’re setting the rule on is not itself in the “Addresses” section, address conditions are offered twice, as separate “Billing Address” and “Shipping Address” groups, so you can target either one specifically
- Core
- Order (additional fields)
- Custom
- Any custom field (same rule as under Contact, above)
- Custom
- Cart and Checkout
- Core (provided natively by WooCommerce)
- Payment method:
is one of/is not one of, picked from your installed payment gateways - Needs Shipping:
true/false - Order Total (with tax):
is more than or equal to/is less than or equal to - Shipping Method:
is one of/is not one of, picked from your store’s shipping zones and methods - Total Quantity in Cart:
is more than or equal to/is less than or equal to. This is the sum of every product’s quantity, so a cart with 2 of product A and 3 of product B counts as 5
- Payment method:
- Custom (computed by the plugin, since WooCommerce doesn’t expose this data natively)
- Order Total (without tax), Order Sub-total (only products, with tax), Order Sub-total (only products, without tax):
is more than or equal to/is less than or equal to - Number of Different Products in Cart:
is more than or equal to/is less than or equal to. This counts distinct products/lines, not quantities, so a cart with 2 of product A and 3 of product B still counts as 2 (as opposed to Total Quantity in Cart, above, which would count 5) - Product Categories, Product Tags, Product Brands:
cart contains one of/cart does not contain one of, picked from your store’s terms - Any other product taxonomy/attributes via the
swcbcf_conditional_cart_product_taxonomiesfilter - Product:
cart contains one of/cart does not contain one of, searched dynamically by name so it works even with thousands of products. If you pick a variable product itself, any of its variations in the cart will match; if you pick a specific variation, only that exact variation will match
- Order Total (without tax), Order Sub-total (only products, with tax), Order Sub-total (only products, without tax):
- Core (provided natively by WooCommerce)
- Customer
- Core (provided natively by WooCommerce)
- Logged In:
true/false
- Logged In:
- Custom (computed by the plugin, since WooCommerce doesn’t expose this data natively)
- User Role:
is one of/is not one of, picked from your site’s roles, plus a “Guest” option to also match logged-out visitors directly within this same condition - Customer First Order:
true/false.trueif the customer has no previous orders, checking by account for logged-in customers and by email address for guests
- User Role:
- Core (provided natively by WooCommerce)
One thing to know when a rule points at a field that is itself shown conditionally: while that field is hidden, WooCommerce clears its value, so it reads as empty. A rule like “show this when that field is empty” is therefore true while the field it points at is hidden. Rules that ask what a value is behave as you would expect, and only match once the field is both shown and filled in.
Is it possible to reorder WooCommerce’s core checkout fields?
Yes. Edit any core address field and set its “Position”, which is still marked beta. The core fields are then ordered by it on the block-based checkout, on the classic checkout and on My Account > Addresses.
“Country” is the exception: WooCommerce doesn’t allow anything before it, so it always comes first and can’t be moved.
You can also remove core address fields (“Last name”, “Company name”, “Street address”, “Apartment, suite, unit, etc.”, “City”, “State / County”, “Postcode / ZIP” and “Phone”), rename them, make them required or optional, globally or per country, and set their width.
Can “First name” and “Last name” have a different name on the billing and on the shipping address?
Yes. Edit the “First name” or the “Last name” core field and tick “Use a different name on the billing and on the shipping address”. You then get three names instead of one:
- Billing: shown when the customer is filling in the billing address only.
- Shipping: shown when the customer is filling in the shipping address only.
- Billing and shipping: shown when one single address form is being used for both. That happens when the customer keeps “Use same address for billing” ticked, and when WooCommerce, Settings, Shipping, “Ship to” is set to force shipping to the customer billing address.
Leave any of the three empty to fall back to the single name set above them, so you only need to fill in the ones that actually differ.
The rule for which one is used is the same one WooCommerce itself uses to decide whether the address section is titled “Shipping address”, “Billing address” or “Billing and shipping address”, so the field names always agree with the title right above them. It updates live, without a page reload, when the customer ticks or unticks “Use same address for billing” or picks local pickup.
This works on the block-based checkout, on the classic checkout, and on My Account > Addresses. Please read “WooCommerce does not support a different core field name per address type” under “Known issues and limitations” below before using it.
Why does renaming “Address line 2” change nothing outside the block-based checkout?
Because WooCommerce hides that one field’s name there. On the classic checkout and on the My Account address forms it gives “Address line 2” a name that only screen readers can see, and shows its placeholder in its place, so the name you set was never shown to anyone looking at the page.
Edit the field and tick “Show the name” to have it displayed like every other field. It’s the only core field this applies to, and it makes no difference to the block-based checkout, which shows the name either way.
What’s the “Pattern” option for?
That’s a way to limit the pattern/format of the inserted value on a text input by using regular expressions.
You can pick one of the common patterns below directly from the “Insert a common pattern…” dropdown next to the field, which fills it in for you (you can still edit it afterward), or type your own.
Here are the built-in examples:
- Only numbers:
^[0-9]+$ - Alphanumeric only:
^[A-Za-z0-9]+$ - Letters only:
^[A-Za-zÀ-ÿ\s'-]+$ - Email address:
^[a-zA-Z0-9._%+-]+@[a-zA-Z0-9.-]+\.[a-zA-Z]{2,}$ - URL (starts with http:// or https://):
^https?://.+$ - Phone number:
^[+]?[0-9\s()-]{7,}$ - At least 8 characters:
^.{8,}$
The pattern is checked by the browser, which is what makes it work on both the block-based and the classic checkout. It is written into the field on the My Account address forms too, but it is not enforced there: WooCommerce renders those forms telling the browser not to validate them, and there is nothing else on that form that would check it. So treat “Pattern” as a checkout option. If you need a value to be validated everywhere, use the custom PHP validation described under “Advanced operation” below, which does run when a My Account address is saved.
What do the “Autofill” and “Capitalization” options do?
“Autofill” tells the browser what the field holds, so it can offer the customer a value they have saved before. Pick the closest match from the list: a “Company registration number” field is not a name, and telling the browser so stops it offering one.
Leaving it unset does not mean “no autofill”. It means the browser guesses from the field’s name and surroundings, and it can guess wrong and fill in something that does not belong. If a field should never be filled automatically, choose “Never offer to fill this field” rather than leaving it unset.
The list is a fixed set of the standard values that make sense at checkout, rather than a free text box, because a wrong value is worse than none.
“Capitalization” tells a mobile keyboard how to capitalize what the customer types: every letter for a VAT or licence plate number, the first letter of each word for a name, or nothing at all for something case sensitive. It only changes what the keyboard offers, never what is saved, and it has no effect on a desktop keyboard.
“Autofill” is offered on text and select fields, “Capitalization” only on text fields, since it has no meaning anywhere else. Both apply on the block-based checkout, on the classic checkout and on My Account > Addresses.
They set the field’s autocomplete and autocapitalize HTML attributes, if you want to check what ends up on the page.
One thing that catches people out: autocapitalize only affects on-screen keyboards. On a desktop browser it does nothing at all, by design, so test it on a phone rather than by typing on your computer.
Can I add my own attributes to a custom field?
Yes, any "data-" attribute you like. Edit the field, go to the “Advanced options” tab, and add a name and a value under "data-" attributes. The data- prefix is added for you, so type probe to get data-probe="..." on the field.
Names are lowercased, and anything other than letters, numbers and dashes is removed, since those are the only characters an attribute name can hold.
This is what to use when you need your own CSS or JavaScript to find a specific field. The alternative is the class WooCommerce builds from the field key, which is not something it promises to keep stable, so a [data-yours="..."] selector is the safer hook.
They apply on the block-based checkout, on the classic checkout and on My Account > Addresses, on every field type.
Why does the title attribute set on the advanced options tab not show when the customer hovers the mouse over the field?
The plugin sets the title attribute on the field, and there’s no specific implementation for tooltips; it’s just the HTML title attribute. Depending on the browser (including its privacy and accessibility settings), device, and the speed at which the user moves the mouse 😏, the tooltip might not show up.
Why aren’t the customizations applied in full to the My Account account information and address forms?
Most of them are. Those forms don’t run the block-based checkout, so it’s worth being precise about what carries over and what doesn’t.
Core fields: everything applies. The name, whether the field is required, its order, removing it, its width, and the different name on the billing and on the shipping address. Settings you made for specific countries follow whichever country the form is being shown for.
Custom fields: they show up, and their name, type, options, position, width, maximum length, tooltip, autofill, capitalization and your own “data-” attributes all apply. The one exception is “Select with fee per option”, below.
Conditional rules apply, but only as the page is built. WooCommerce works them out once, on the server, while rendering the form. So a rule based on the customer, the cart, or a value already saved is respected, but a rule that depends on another field on the same form doesn’t follow along as the customer types, the way it does on the checkout.
Custom PHP validation through the swcbcf_validate_callback_{location}_{field-slug} filter does run when a My Account address is saved.
The “Pattern” option doesn’t work there, for the reason given under “What’s the ‘Pattern’ option for?” above.
“Select with fee per option” fields are not shown on these forms at all. The fee is added to the cart, so the field would render as an ordinary select, with the fee still written into every option label, and choosing one would charge nobody anything.
“Full width” is the block-based checkout’s own layout option, which is what the separate “Width” option is for.
Advanced operation
How are the fields stored in the database, and how can I fetch them?
The fields are stored on orders and users’ meta on the _wc_other/swcbcf/field-slug, _wc_billing/swcbcf/field-slug and _wc_shipping/swcbcf/field-slug meta keys.
You can see the meta key for each field by editing it and opening the “Developer information” tab:
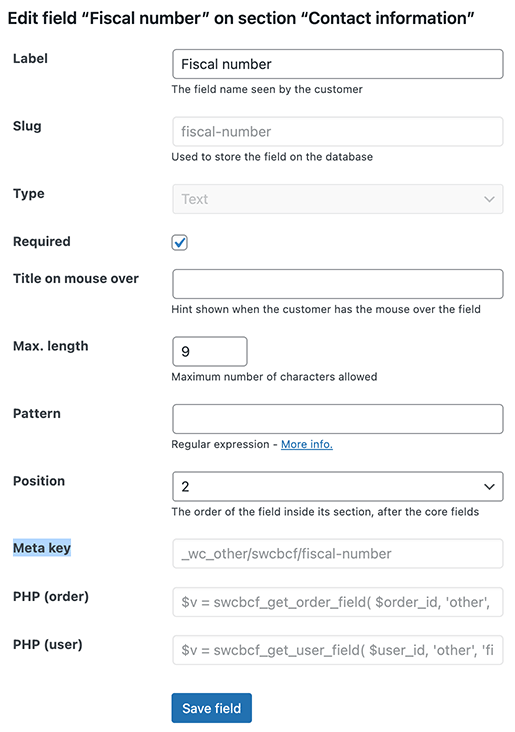
You can should use our helper functions to get each field value if you need to use them in your custom code. The PHP to use for each field is shown on that same tab, ready to copy, for both the order and the user.
There are two helper functions:
swcbcf_get_order_field – To get order fields
Arguments:
$order_id– The order ID$location– The location: ‘other’ (for contact or additional fields), ‘billing’ or ‘shipping’ (for address fields)$field_slug– The field slug
swcbcf_get_user_field – To get user fields
Arguments:
$user_id– The user ID$location– The location: ‘other’ (for contact fields), ‘billing’ or ‘shipping’ (for address fields)$field_slug– The field slug
Is there a way to list every field this plugin has registered?
Yes, if you’re integrating with this plugin from your own code. swcbcf_get_registered_fields_keys() returns every field currently registered, including the ones coming from bundled field definitions, grouped by section:
array(
    'contact' => array(
        'meta_location' => array( 'other' ),
        'fields'        => array( 'field-slug', 'another-field-slug' ),
    ),
    'address' => array(
        'meta_location' => array( 'billing', 'shipping' ),
        'fields'        => array( 'field-slug' ),
    ),
    'order'   => array(
        'meta_location' => array( 'other' ),
        'fields'        => array( 'field-slug' ),
    ),
)
Combine the slug with one of the meta_location values to build the meta key, or pass them to the helper functions above. Call it on woocommerce_init or later, so that all the fields have been registered.
Is it possible to validate each field with custom PHP?
Since version 1.0, you can validate each field individually, but without having access to the other fields and values of the checkout, which means you still can’t do cross-validation between several fields.
It might be possible to get those values by accessing the customer or order object; however, this is not supported, and there are no guarantees regarding backward compatibility in future versions.
For individual field validation, you need to use our filter swcbcf_validate_callback_{location}_{field-slug} and return a string with the error description or nothing if the validation has passed, like in this example.
The complete filter name for each field is shown on the field’s “Developer information” tab.
This filter is internal of our plugin and it’s called on a generic validation function we’ve defined at the validate_callback parameter for all fields when registering them with WooCommerce.
Is it possible to bundle field definitions with a plugin or theme?
Yes. If you’re a developer, you can ship a set of custom fields and core field overrides with your own plugin or theme, in a versioned, Git-controllable way, instead of asking your users to set them up by hand.
The workflow reuses our existing export tool: set the fields up on a dev or staging site using this plugin’s admin screen, click “Export field definitions”, and bundle the resulting JSON file with your plugin or theme. Then register its path with our filter:
add_filter( 'swcbcf_bundled_field_definition_files', function ( $files ) {
    $files[] = __DIR__ . '/checkout-fields.json';
    return $files;
} );
The path must be absolute, as in the example above. Relative paths are not resolved, and the file will be reported as not found.
Register the filter early: directly in your plugin’s main file, on plugins_loaded, or in your theme’s functions.php. The definitions are read the first time something needs them, which is when we register the fields with WooCommerce on woocommerce_init. A filter added after that point is never seen, and your fields simply won’t show up.
To change the fields later, set them up again on your dev or staging site and export a new file. Don’t edit the JSON by hand: its structure can change between plugin versions, and hand-written files aren’t supported. Exporting is what makes the file safe to commit, diff, and roll back like any other part of your code.
Fields and core field overrides loaded this way are never written to the database. They’re read fresh from the file on every request, so they always match what’s in your plugin or theme’s code. In the admin UI, they appear locked (no Edit or Delete option), with a lock icon showing which file they came from.
If an admin already created a custom field with the same slug as a bundled one, the bundled definition takes precedence. The admin’s field is left in the database untouched, but it’s flagged as inactive in the admin UI until it’s renamed or removed.
You can register more than one file. If two files define the same slug or the same core field, the first one registered wins, and a warning is shown in the admin UI.
Nothing fails silently. This plugin’s settings screen warns you when a file can’t be found or read, when it isn’t valid JSON, when a field entry is missing its slug, label or type (that entry is skipped and the rest of the file still loads), and when a slug or core field override is already defined by another bundled file.
Core field bundling only supports the “address” section, matching the rest of this plugin’s core field support.
There is currently no way to unlock a bundled field from the admin UI.
WPML Integration
How to translate the field labels to additional languages when using WPML and WooCommerce Multilingual?
Whenever you create or edit a field, its label is registered on WPML for translation under the website’s default language.
The same happens when you rename one of WooCommerce’s core fields, for the options of a “Select” or “Select with fee” field, and for the orders list column title, if you set one. Fields bundled by a plugin or theme (see “Advanced operation” above) and field definitions brought in through the “Import field definitions” tool are registered too, so there’s nothing you need to open and save by hand.
To translate to additional languages, you need to go to WPML > String translation > Filter by the “simple-woo-checkout-blocks-cf” domain and then translate each string. There is a link straight to that filtered screen at the top of the plugin’s own settings page.
While any of them are still untranslated, a notice on the WooCommerce admin screens says how many are missing and links to the same place. It is easy to add a field in one language and forget the others, and the checkout is the last place you want to find out. If your site deliberately leaves some strings untranslated, the swcbcf_wpml_untranslated_notice filter turns the notice off.
The strings are named after the section and the field slug, so you know which is which:
address-my_fieldfor a custom field nameaddress-my_field-option-expressfor one of a select field’s optionsaddress-my_field-orders-list-titlefor an orders list column titlecore-address-companyfor a core field namecore-address-first_name-billing,-shippingand-billing-shippingfor a core field’s names per address type
Third-party compatibility
Create User Account from WooCommerce Guest Order
If you use our “Create User Account from WooCommerce Guest Order” plugin, your custom “Contact information” and “Address” fields are automatically copied over from the guest order to the new user account, alongside WooCommerce’s own core fields. This includes fields bundled by a plugin or theme (see “Advanced operation” above), not just the ones you created through this plugin’s admin screen.
Shop as Client Pro
If you use our “Shop as Client for WooCommerce PRO” plugin, selecting an existing customer at checkout pre-fills your custom fields with their previously saved values, alongside WooCommerce’s own core fields. This includes fields bundled by a plugin or theme, not just the ones you created through this plugin’s admin screen.
Multi-currency plugins
If your shop uses a multi-currency plugin, the swcbcf_select_with_fee_per_option_fee_value filter lets you convert a “Select with fee per option” fee to the customer’s currency before it’s applied to the cart. The swcbcf_select_with_fee_per_option_show_value filter lets you remove the fee amount from the option label entirely, if you’d rather show it some other way.
Known issues and limitations
For most of the issues or limitations, we are working closely with the WooCommerce development team in order to release fixes or new possibilities.
Other types of fields are not available
At the time, only this type of custom field are allowed by the WooCommerce Additional fields API:
- INPUT type text
- SELECT
- SELECT (with fee per option, developed by us on top of the regular select)
- CHECKBOX
There are issues opened for the following field types:
- INPUT type email, number*, tel, and URL: https://github.com/woocommerce/woocommerce/issues/45989
- INPUT type date: https://github.com/woocommerce/woocommerce/issues/45938
- TEXTAREA: https://github.com/woocommerce/woocommerce/issues/45988
* INPUT type number can be partially achieved by entering \d* as a pattern for the regular INPUT field.
It’s not possible to add masks to input fields, in order to get formatted values like Portuguese Cartão do Cidadão, Brazilian CPF or CNPD, Phone numbers, etc
We suggested this to WooCommerce: https://github.com/woocommerce/woocommerce/issues/58484
In the meantime, you can check this blog post and achieve validation and masks for Brazilian CPF or CNPD.
It’s not possible to add extra classes to custom fields
Extra classes on a custom field would help with third-party styling, or with targeting it from JavaScript.
We suggested this to WooCommerce: https://github.com/woocommerce/woocommerce/issues/50795
That request covered "data-" attributes as well, and those WooCommerce does accept, so we now offer them (see “Can I add my own attributes to a custom field?” above). A [data-something="x"] selector works perfectly well in CSS, which makes it a reasonable stand-in until custom classes are possible.
Core field customizations (label, visibility, required, order) and custom field order don’t apply until a country is selected
This is not yet fixed in WooCommerce 11.1.0
This is due to a bug in WooCommerce.
Managing WooCommerce’s core address fields (renaming them, hiding them, making them required or not, changing their order) works through the woocommerce_get_country_locale and woocommerce_get_country_locale_default filters. The second one is meant to provide the default/fallback values used before a specific country has been chosen, but WooCommerce Blocks Checkout doesn’t apply it: it shows the untouched WooCommerce defaults for every core field, and custom fields in their untouched default order, until the customer actually picks a country in the checkout form. Once a country is selected, everything (including our new bundled field definitions, see “Advanced operation” above) applies correctly, and stays correct for the rest of that checkout session.
We reported this to WooCommerce: https://github.com/woocommerce/woocommerce/issues/60542
WooCommerce does not support a different core field name per address type
This is not fixed in WooCommerce 11.1.0
WooCommerce offers no way, on the server or in the browser, of giving a core address field a different name on the billing and on the shipping address form of the block-based checkout. The country locale and the “defaultFields” setting, which are the only two things that carry a core field’s name to the checkout, are a single structure shared by both forms, and no filter is ever applied to a field’s name. The address type is available in WooCommerce’s own code where the fields are prepared, but it is only used for the conditional required/hidden rules and for the field’s id, name and autocomplete section, never for the name shown to the customer.
So, on the block-based checkout only, this plugin sets the names with JavaScript right after WooCommerce renders the form, and again whenever WooCommerce re-renders it. Two consequences worth knowing:
- The customer may briefly see the single name before the per address type one replaces it.
- It relies on markup that is not an official extension point, so it may need revisiting when WooCommerce changes the checkout.
The classic checkout and My Account > Addresses are not affected by any of this: WooCommerce does offer proper per address type filters there, and that is what this plugin uses.
The closest related WooCommerce issue is https://github.com/woocommerce/woocommerce/issues/57810, where WooCommerce proposes deprecating woocommerce_billing_fields and woocommerce_shipping_fields, the very filters that make this work properly on the classic checkout, and suggests the country locale as their replacement. The country locale cannot express a different name per address type, so that would remove the capability with nothing equivalent to put in its place.
Custom field values saved by the classic checkout are not shown on the order
This is not fixed in WooCommerce 11.1.0
When an order is placed on the classic checkout, the custom field values are saved on it correctly, under the same meta keys the block-based checkout uses. WooCommerce does not show them back: not on the order confirmation (thank you) screen, not in the order emails, and not on the customer’s order view under My Account.
Every one of those goes through a single WooCommerce method, CheckoutFields::get_order_additional_fields_with_values(), which returns nothing at all for an order that was not created through the block-based checkout, with no filter to change the decision.
The order edit screen in the admin is not affected, because this plugin adds the fields to it itself. That is a workaround rather than a fix: it is the screen a shop owner reads to fulfil an order, so it was worth doing, but the same treatment for the other three would mean reimplementing WooCommerce’s own rendering to show data it already holds.
Also unaffected: the orders list column, if you turn on “Show on orders list” for the field, and the swcbcf_get_order_field() helper described under “Advanced operation” above.
We reported this to WooCommerce: https://github.com/woocommerce/woocommerce/issues/68156
Resolved limitations
These used to affect this plugin, but have since been resolved on WooCommerce’s side. Each entry notes which version of this plugin you need (if any) to benefit from the fix.
The option to hide custom fields on order confirmation was not hiding them everywhere
Fixed in WooCommerce 10.1, and fully from 11.1. No update to this plugin is needed to benefit from it.
“Hide on order confirmation” was honoured for contact and order fields, and in the emails, but an address field kept showing on the order confirmation (thank you) screen.
We reported this to WooCommerce: https://github.com/woocommerce/woocommerce/issues/51258
A first fix landed in WooCommerce 10.1 and covered most of it. We confirmed the rest, address fields on the confirmation screen, working on WooCommerce 11.1. On anything older, the plugin now says so under the option itself.
After the validation fails, the error message will not go away, even if the field is corrected
Fixed in WooCommerce 10.0. No update to this plugin is needed to benefit from this fix: it applies automatically as soon as your site runs WooCommerce 10.0 or above.
We reported this on WooCommerce Slack and got the confirmation that the fix will be available on WooCommerce 10.0.
We also asked why the validation messages are shown as global checkout errors instead of being tied to each field, and proposed that this be changed.
Validation callback not running for fields conditionally shown
Fixed in WooCommerce 10.0, confirmed working on our end as of plugin version 8.0. No code change was required on our side; version 8.0 is when we confirmed and documented that WooCommerce’s fix resolves it.
Since version 5.0, we have allowed for custom fields to be shown conditionally. In the meantime, we found out that the function registered for validation callback, which will call the filter mentioned above, was not reliably called (or was called for fields that should have been hidden) when custom fields had conditional visibility rules.
We reported this to WooCommerce: https://github.com/woocommerce/woocommerce/issues/58488